

|
|
| Home | PhotoAcute Studio | Technology |
| Product | How to use | Examples | Download | Order | Support | |||||||||
|
This instruction describes the procedure of taking sample pictures for producing PhotoAcute Studio profile for DSLR and SLR-like cameras.
Note: Please read the description carefully, as the procedure requires strict adherence to the instruction. Contact us if something is unclear. If, at any stage of the process, you are not sure whether you are making good samples or not, you can just send us a couple of samples for review.
Prerequisites
1. LCD/TFT monitor
2. Tripod 3. Camera with either a shutter remote control or self-timer mode
Efforts
You will need to take about 100 RAW photographs of the sample target with different camera settings.
You will need to upload a large volume of data over the Internet.
The procedure
Camera settings
Switch the camera to "aperture priority" mode.
Switch off the flash. Set ISO level to 200-400. Set picture format to RAW. To avoid any camera shaking during taking the pictures, it is necessary to use remote control or self-timer mode.
Zoom levels
You will need to take series of pictures at different focal lengths (zoom levels). The range always includes the minimal and maximal zoom levels and one or more intermediate levels. You do not need to set the intermediate levels precisely; it is enough to do it "by eye".
Apertures
At each zoom level you should take several sets of images, each set at different aperture value.
The following apertures should be used (at each zoom level): - closest one to f/20 (e.g. f/22) - closest one to f/10 (e.g. f/11) - widest aperture at current focal length - if the widest aperture is f/2.7 or even wider, the one closest to f/4.5 (e.g. f/5.6) is also required for example: For Canon EOS 350D equipped with kit EF-S 18-55mm f/3.5-5.6 lens, the optimal set of images for profile creation would be: - focal length 18, aperture f/3.5 - focal length 18, aperture f/11 - focal length 18, aperture f/22 - focal length 30, aperture f/4 - focal length 30, aperture f/11 - focal length 30, aperture f/22 - focal length 55, aperture f/5.6 - focal length 55, aperture f/11 - focal length 55, aperture f/22
Opening the sample picture
Sample photos are taken by photographing the special picture viewed on the display (or printed - see below).
Depending on your display's resolution, click one of the links: 1024xN 1152xN 1280xN 1400xN 1600xN to open the sample picture. View the picture in full screen mode (activated by pressing F11 key in most browsers). Please make sure that the picture is not resized by the browser. If the picture does not fit in your display in height, please use the picture for lower resolution.
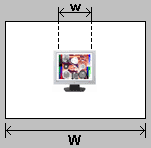
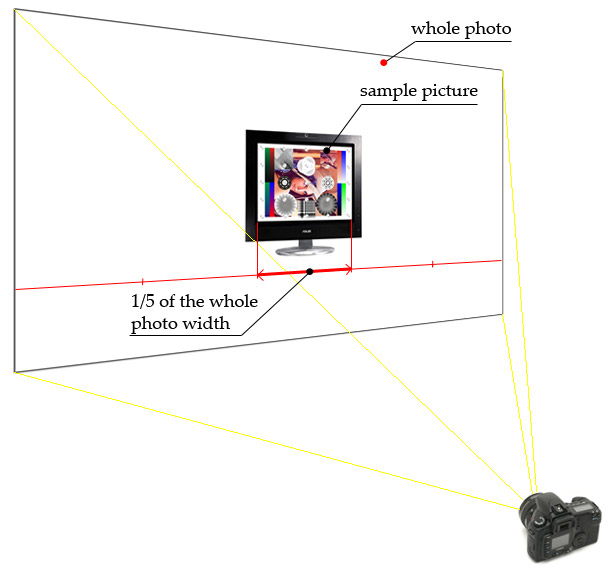
Choosing the distance
Choose the distance to the display: the width w of the picture on the screen should make up a certain part of the whole photo width W, depending on the camera and monitor resolution. The appropriate distance should be chosen for each zoom level. Please refer to the following table to determint the required ratio:
w/W table:
For example: if you have 5 MPix camera and 1280x1024 display, the sample picture should take 1/5th of whole snapshot width. Click here for an illustration. Important: You should keep w/W ratio for each zoom level, so the higher zoom will require longer distance.
Alternative: printed target
As an alternative, you can use a printed target:
http://photoacute.com/files/perfect_big.jpg Printed on at least 600 dpi printer it can be taken with about twice lower w/W rate (so twice shorter distance). Make sure that the print is oriented rigth as the jpg is displayed (see here), do not rotate it or place upside-down, etc
Taking the photos
Set of photos to take at each combination of zoom level and aperture
At each combination of zoom level and aperture, you need to take 10 pictures.
Important: the pictures should not be pixel-to-pixel coincident. You should slightly dispose the camera or the target before taking each next picture (make sure that the auto focus area hits the target). About 5 millimeters camera displacements are enough. It is recommended to tilt the monitor a little so that the horizontal movements of the camera should lead to both horizontal and vertical movements of the picture in the photo.
Sending the results
Make the sample images sorted by focal length and aperture - either put them in separate folders in the archive (like "50mmf3_5" for 50 mm f/3.5) or make their names reflect the focal length and aperture (like "50mmf3_5_00, 50mmf3_5_01, etc").
You can compress the resulting files using any common archiver (rar, zip, gzip, bzip and so on). There are several ways of transferring the results: Uploading to our server via ftp or web upload service: Please contact us to get the login/password. Uploading to other ftp/http server: If you have a possibility to upload the results to any server accessible by ftp/http, you can do that and send us the link. Using http-push service: You can send the results using some public http-push service like www.yousendit.com |
| Developed by Almalence :: Design by A.Green |
