

|
|
| Home | PhotoAcute Studio | Technology |
| Product | How to use | Examples | Download | Order | Support | |||||||||
This instruction describes the procedure of taking sample pictures for producing PhotoAcute Studio profile for compact cameras and mobile phone cameras. Sample photographs are made by snapping the special picture viewed on your display. To make the sample photographs, you should have flat LCD/TFT display with at least 1024xN resolution. Note: Please read the description carefully, as the procedure requires strict adherence to the instructions. Contact us if something is unclear. If, in any stage of the process, you are not sure whether you are making good samples or not, you can just send us a couple of samples for review (the best would be taken at minumum and maximum optical zoom levels). The procedure: 1. Selection of the sample picture Depending on your display's resolution, click one of the links: 1024xN 1152xN 1280xN 1400xN 1600xN to open the sample picture. View the picture in full screen mode (activated by pressing F11 key in most browsers). Please make sure that the picture is not resized by the browser. Important: your display should be set to its 'native' resolution lest the picture be distorted. |
2. Choosing the distance to the display The width w of the picture on the screen should be a certain part of the whole photograph width W, depending on the camera and monitor resolution. Please refer to the following table to define the required part: |
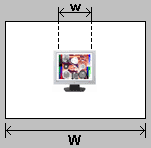 |
w/W table: |
Native LCD resolution (width) |
0.3 MPix |
1 MPix |
2 MPix |
3 MPix |
4 MPix |
5 MPix |
6 MPix |
7 MPix |
8 MPix |
9 MPix |
10 MPix |
11 MPix |
12 MPix |
1024 |
1/2 |
1/3 |
1/4 |
1/4 |
1/5 |
1/6 |
1/7 |
1/7 |
1/7 |
1/8 |
1/8 |
1/9 |
1/9 |
1152 |
1/2 |
1/3 |
1/4 |
1/4 |
1/5 |
1/5 |
1/6 |
1/7 |
1/7 |
1/7 |
1/7 |
1/8 |
1/8 |
1280 |
1/1 |
1/2 |
1/3 |
1/4 |
1/4 |
1/5 |
1/5 |
1/6 |
1/6 |
1/6 |
1/7 |
1/7 |
1/7 |
1400 |
1/1 |
1/2 |
1/3 |
1/4 |
1/4 |
1/4 |
1/5 |
1/5 |
1/5 |
1/6 |
1/6 |
1/6 |
1/7 |
1600 |
1/1 |
1/2 |
1/3 |
1/3 |
1/3 |
1/4 |
1/4 |
1/5 |
1/5 |
1/5 |
1/5 |
1/6 |
1/6 |
For example: if you have 5 MPix camera and 1280x1024 display, the sample picture should take 1/5th part of whole snapshot width. |
3. Adjusting the exposure Adjust the exposure of your camera so the round gray-and-white marks are visible on the picture. You may need to snap several photographs with different exposures and change the monitor brightness to find the right conditions. Please also note, that it is better to take photographs at ISO level about 400, even if your camera makes noisy images at this ISO. |
 |
4. Choosing zoom levels You will need to take several sets of pictures at different focal lengths (zoom levels). The range always includes the minimal and maximal zoom levels and one or more intermediate levels. You do not need to set the intermediate levels precisely; it is enough to do it "by eye".
|
5. Taking a series of photos at each zoom level At each zoom level, take 8-10 snapshots of the sample picture (either using "continuous mode" or manually). Important: pictures should not be pixel-to-pixel coincident. When holding camera in hands, it always moves slightly, so the picrutes are shifted a little. But if you use a tripod, you should move the camera (or the display) a little after taking each single snapshot. 6. Taking additional full-screen photos In addition, take two photos of the sample picture closer to the display, so the picture takes all the photo size - one photo at the maximum zoom and one at the minimum zoom. Important: sample picture should take all the photo size, even if the camera cannot focus on the required distance. For prime lens you should take only one full-screen photo. click here for examples of good and bad full-screen photos 7. Pre-processing of the images. All photos, except the full-screen photos, should be pre-processed using PhotoAcute Studio:
To avoid transferring a lot of files you can compress the resultant files using any common archiver (rar, zip, gzip, bzip and so on). There are several ways of transferring the results: Uploading to our server via web upload service (recommended) or by ftp: You can upload the results using our web upload service or by ftp. Please contact us to get the login/password. Uploading to other ftp/http server: If you have the possibility of uploading the results to any server accessible by ftp/http, you can do that and send us the link. Using http-push service: You can send the results using some public http-push service like www.yousendit.com Sending by email. Send the results as the attachments to support@photoacute.com (usially this is not a good way for transferring huge files) |
| Developed by Almalence :: Design by A.Green |